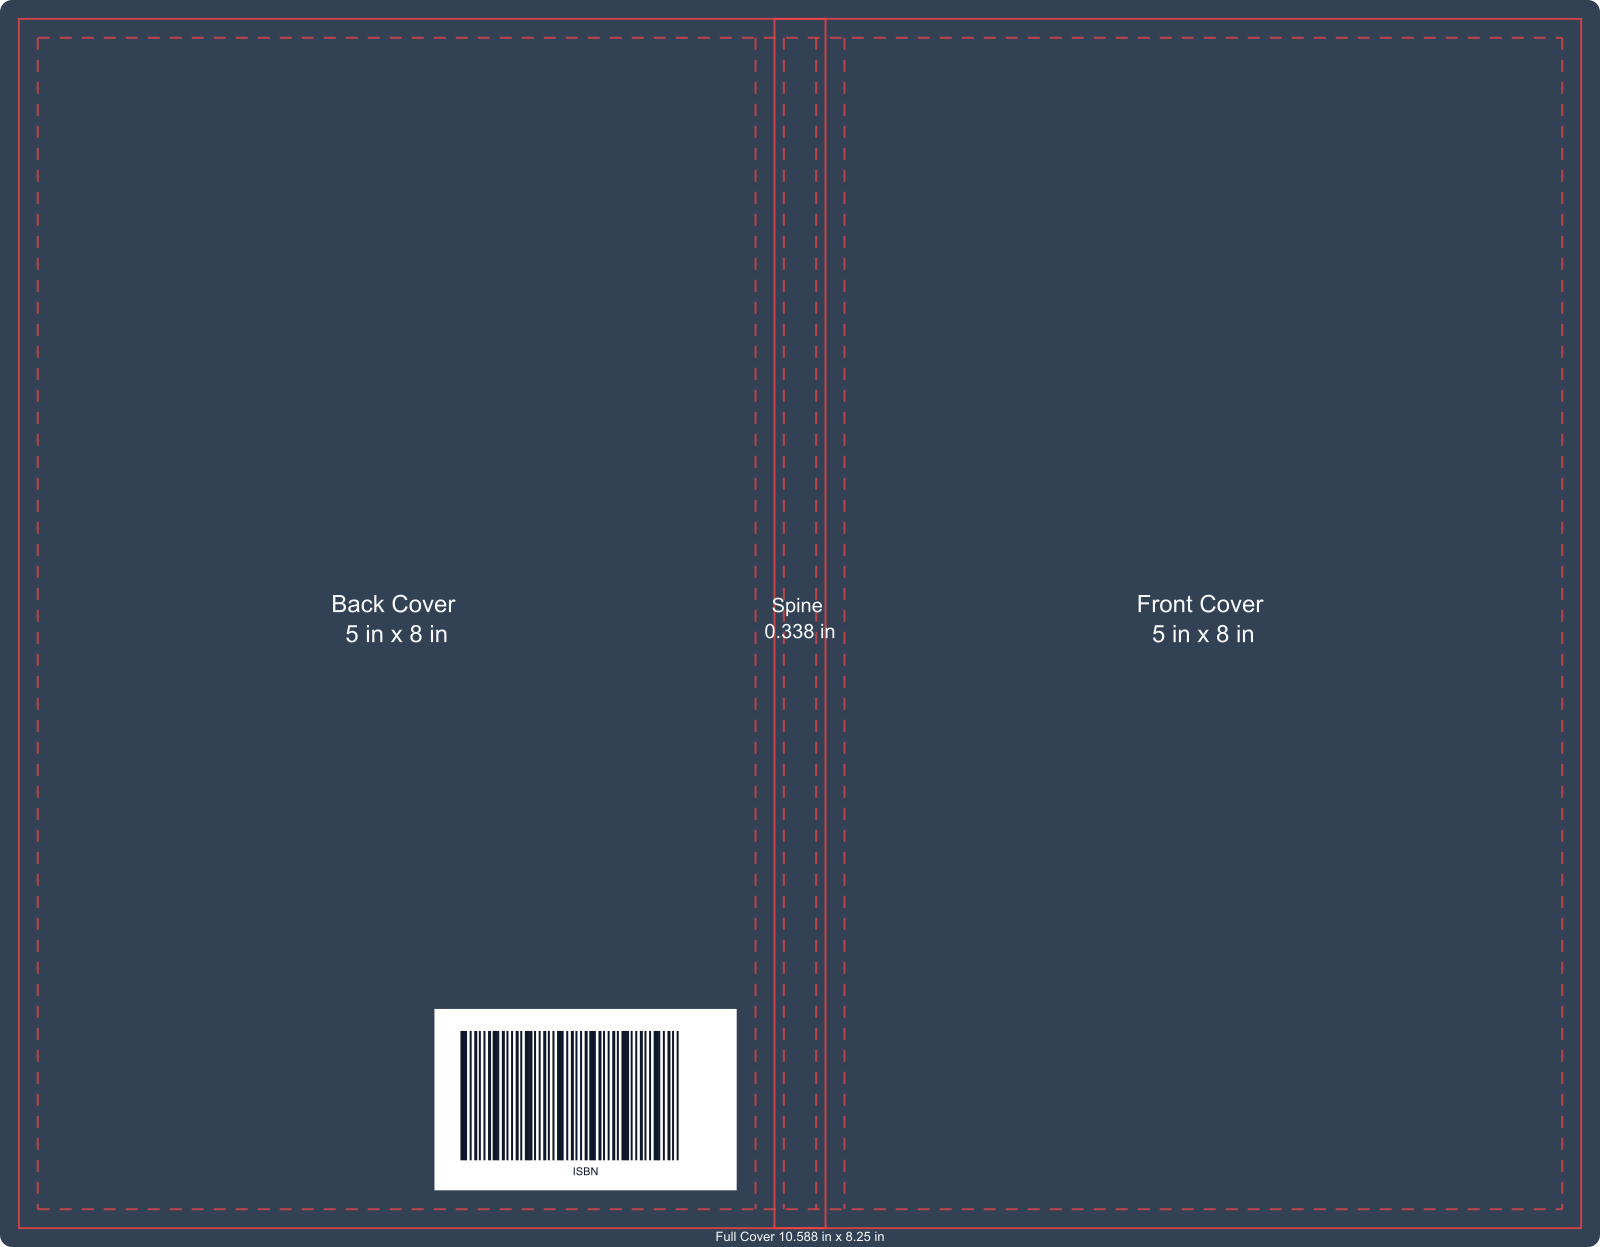
Make a KDP full wrap cover from final book settings and existing front-cover art, then export one correctly sized paperback PDF for Previewer.
A KDP full wrap cover is one print-cover file containing the back cover, spine, and front cover in that order from left to right. It also includes the bleed KDP needs outside the finished trim edges.
To make one correctly, finish the interior first, get the exact cover dimensions for those book settings, build the whole wrap on one canvas, export one clean PDF, and inspect that PDF in KDP Previewer.
Do not start from a generic paperback template or a fixed pixel size. A full wrap cover changes when the trim size, page count, paper type, or binding changes.
This guide explains how to choose a production path, get the measurements you need, and turn them into a finished wrap.
| Step | What you do | What you should have afterward |
|---|---|---|
| 1 | Lock the interior and print settings | Final trim size, page count, paper, interior, and binding |
| 2 | Get current dimensions and a matching template | Exact full-cover width, height, spine, and guide file |
| 3 | Create one wide cover canvas | Back, spine, and front in one document |
| 4 | Place the front cover | Existing front art fitted without stretching |
| 5 | Build the back cover | Blurb and supporting content with barcode space left clear |
| 6 | Finish the spine | Centered text with room for production movement, when eligible |
| 7 | Check bleed and safe areas | Background reaches the edge; important content stays safe |
| 8 | Export and inspect one PDF | Clean, correctly sized cover ready for KDP Previewer |
This is a production workflow, not only a design exercise. A good-looking cover is not ready until the final PDF matches the current book.
Gather these inputs before you make the cover:
The page count must come from the final interior file you intend to upload. It includes front matter, body matter, back matter, and blank pages in that file. A word-count estimate or an early manuscript draft is not enough.
Page count matters because it changes the spine width. A wider or narrower spine changes the full cover width and moves the front and back panel boundaries. If the interior changes later, calculate the cover again before uploading it.
If you have not chosen a finished book size yet, start with the KDP trim-size guide. Make that decision before arranging the wrap.
There is no single required design program. Choose the path that matches the material you already have and the amount of control you need.
| Starting point | Practical path | Best for | Main limitation |
|---|---|---|---|
| You need a simple cover inside KDP | KDP Cover Creator | Basic layouts and a guided KDP workflow | Less control over custom composition |
| You want to design the entire wrap yourself | Canva, Affinity, InDesign, Photoshop, or similar software | Precise control over back, spine, and front | You must set up and export the file correctly |
| You already have a finished eBook or front cover | Extend that design into a paperback wrap | Keeping the approved front while adding print-only areas | New back and spine artwork still need to fit the front naturally |
| You do not want to prepare a print file | Hire a cover designer | Complex typography, illustration, or production needs | More cost and a handoff process |
KDP's Create a Paperback Cover guidance covers both uploading your own file and using Cover Creator.
If you do not have usable front-cover artwork yet, start with the KDP Book Cover Generator to create a cover around your book format and print settings. If you are working in Canva, follow the Canva-to-KDP export guide for the program-specific setup. The existing-front-cover path appears later in this guide.
Use the same final settings you will use in KDP. KDP's official Print Cover Calculator and Templates can generate a current template. The KDP Cover Size Calculator shows the full cover size, spine width, safe areas, bleed, and barcode reserve together before you begin.
Do not use the trim size as the cover canvas size. A 5 x 8 paperback has two 5 x 8 finished panels, but the full file must also include the spine and outside bleed.
Use these settings:
5 x 8 inches150For this example, the result is:
| Measurement | Size |
|---|---|
| Finished back cover | 5 x 8 in |
| Spine width | 0.338 in |
| Finished front cover | 5 x 8 in |
| Full cover with bleed | 10.588 x 8.25 in |
| 300 DPI reference size | About 3176 x 2475 px |
The full width is not simply 10 inches. It includes both panels, the 0.338-inch spine, and 0.125-inch outside bleed on the left and right. The height includes 0.125-inch bleed above and below the 8-inch trim height.
This example helps you understand the layout. Do not reuse its numbers for another book. Generate a new result from your own final settings.
A template is a guide for positioning your artwork. It is not the finished cover, and it should not remain visible in the PDF you upload.
| Template area | What it means | What belongs there |
|---|---|---|
| Back cover | Left finished panel on a left-to-right book | Blurb, author information, reviews, and supporting art |
| Spine | Narrow center strip between the panels | Title, author, logo, or background only |
| Front cover | Right finished panel | Main title, author name, subtitle, and focal artwork |
| Bleed | Area beyond the trim edge | Background color and artwork that should print to the edge |
| Safe area | Interior zone away from trim and fold risk | Text, logos, faces, borders, and other important elements |
| Barcode reserve | Clear area on the back cover | Empty or low-detail space for the KDP barcode |
Place the current KDP template over your canvas as a temporary guide. Align it to the full page, lower its opacity if needed, and lock it while you design. Before export, hide or remove the guide so no template text, colored lines, or labels appear in the final PDF.
For a left-to-right book, the front cover belongs on the right side of the wrap. If you already have a finished eBook cover, place it inside the front-panel trim boundaries.
Keep its proportions. Do not stretch the image horizontally to fill the wider wrap. If the front art does not cover the bleed, extend the background or rebuild the outer edges while keeping the title, author name, faces, and other important details inside the safe area.
An eBook cover image is only the front panel. It does not become a paperback cover merely because it is exported as a PDF.
The back cover usually needs less content than authors first expect. A practical hierarchy is:
Prioritize readability at actual print size. Several long reviews, a full biography, multiple logos, and dense sales copy can make the panel harder to scan.
Keep the lower back-cover area flexible. If you do not supply your own barcode, KDP can place one during publishing. Avoid putting essential text, faces, QR codes, or important artwork in the barcode reserve shown on the template.
Continue the back or front background through the spine so the three parts feel like one cover. Avoid placing a sharp color change exactly on either spine fold unless a small production shift would still look acceptable.
For an uploaded paperback cover, KDP says the book must have at least 79 pages before it can include spine text. Spine text also needs at least 0.0625 inches of space from each side of the spine.
Even when the book meets the page rule, do not force a long subtitle into a narrow spine. Use the title and author name only, reduce the type carefully, or omit spine text when there is not enough room. Center it on the actual spine area, not on the full canvas.
The KDP spine-width guide explains how page count and paper type change this space.
Bleed and safe area solve different problems.
Bleed prevents white edges. Any background, texture, photograph, or illustration that should reach the finished edge must continue through the trim line to the outer edge of the cover file. For a paperback cover, this normally means 0.125 inches at the top, bottom, and outside edges.
Safe area protects important content. Keep titles, author names, review quotes, logos, faces, QR codes, borders, and other live elements away from trim and fold boundaries. Do not use the bleed edge as a text-alignment guide.
Use extra breathing room around the spine. Print-on-demand production has physical variation, so a design that only works when both folds land with perfect precision is fragile. Continuous backgrounds and forgiving transitions handle small movement better than thin borders or hard panel seams.
For a closer visual explanation, see the KDP bleed and trim-line guide.
Your final upload should be a single-page PDF containing the complete back-spine-front wrap.
Before exporting, check the source document:
Then check the exported PDF itself:
Do not trust the source editor preview alone. Open the exported PDF in a separate viewer and inspect all four outer edges, both spine joins, small back-cover text, and the barcode area at high zoom.
If the file looks right but KDP still rejects it, use the PDF cover rejection checklist to isolate page-size, font, image, transparency, and hidden-object problems.
Upload the final interior first, because KDP uses it to determine the page count. Then upload the cover PDF made for the same settings and open Previewer.
Check these areas one by one:
Fix warnings in the source document and export again. Do not stretch the finished PDF to silence a size error; that can distort the art and move every internal boundary.
Passing Previewer is an important file check, but it does not guarantee that every printed copy will be physically centered to the pixel. Leave practical room around folds and trim, then order a proof copy when the exact printed result matters.
| Mistake | Why it happens | Better fix |
|---|---|---|
| Uploading only the front cover | The author starts from an eBook cover | Build one back-spine-front PDF |
| Using trim size as the whole canvas | 6 x 9 is mistaken for the paperback file size | Use the calculated full-cover width and height |
| Reusing an old template | Page count, paper, trim, or format changed | Generate a fresh template from final settings |
| Stretching the front artwork across the wrap | The front file does not match the wider canvas | Preserve its proportions and extend the background separately |
| Leaving template lines in the PDF | The guide layer was exported with the art | Hide or remove the template before export |
| Placing text into bleed | Bleed is mistaken for usable layout space | Move important content inside safe areas |
| Filling the barcode reserve | Back-cover content is arranged before barcode planning | Leave that area clear or use a low-detail background |
| Crowding a narrow spine | The page-count rule is treated as a promise that text will fit | Simplify or remove spine text |
| Reusing a paperback file for hardcover | Both are called full-wrap covers | Generate a separate file for the selected binding |
| Accepting Previewer without a proof | On-screen approval is treated as exact physical alignment | Use forgiving joins and order a proof copy |
You do not need to redesign a front cover that already works. Keep it as the visual anchor and build the print-only areas around it:
The eBook-to-Paperback Cover Converter follows this path: upload the existing front, choose the KDP book settings, add back and spine content, review the complete wrap, and prepare a print-ready export. Use it when the front is already settled and the missing job is the paperback file around it.
If all twelve checks pass, you have the right kind of deliverable: one current, book-specific KDP full wrap cover PDF rather than a generic template or a front-cover image.